If you’re trying to figure out how to add a link to a WordPress Group block to create entire clickable sections or cards, you’re in the right place. This is a popular technique for developers and web designers who want to build more intuitive and interactive layouts. This guide provides a clear, step-by-step process to achieve this.
Why link an entire Group block?
Before getting to the “how,” let’s cover the “why.” Making an entire group of blocks clickable, instead of just a single line of text or a button, has significant benefits:
- Improved user experience and cohesive interaction: It creates a large, easy-to-click target area and allows the entire section to function as a single, clickable component.
- Increased engagement: By making it easier to navigate, you can guide visitors more effectively to key pages, boosting conversions and time on site.
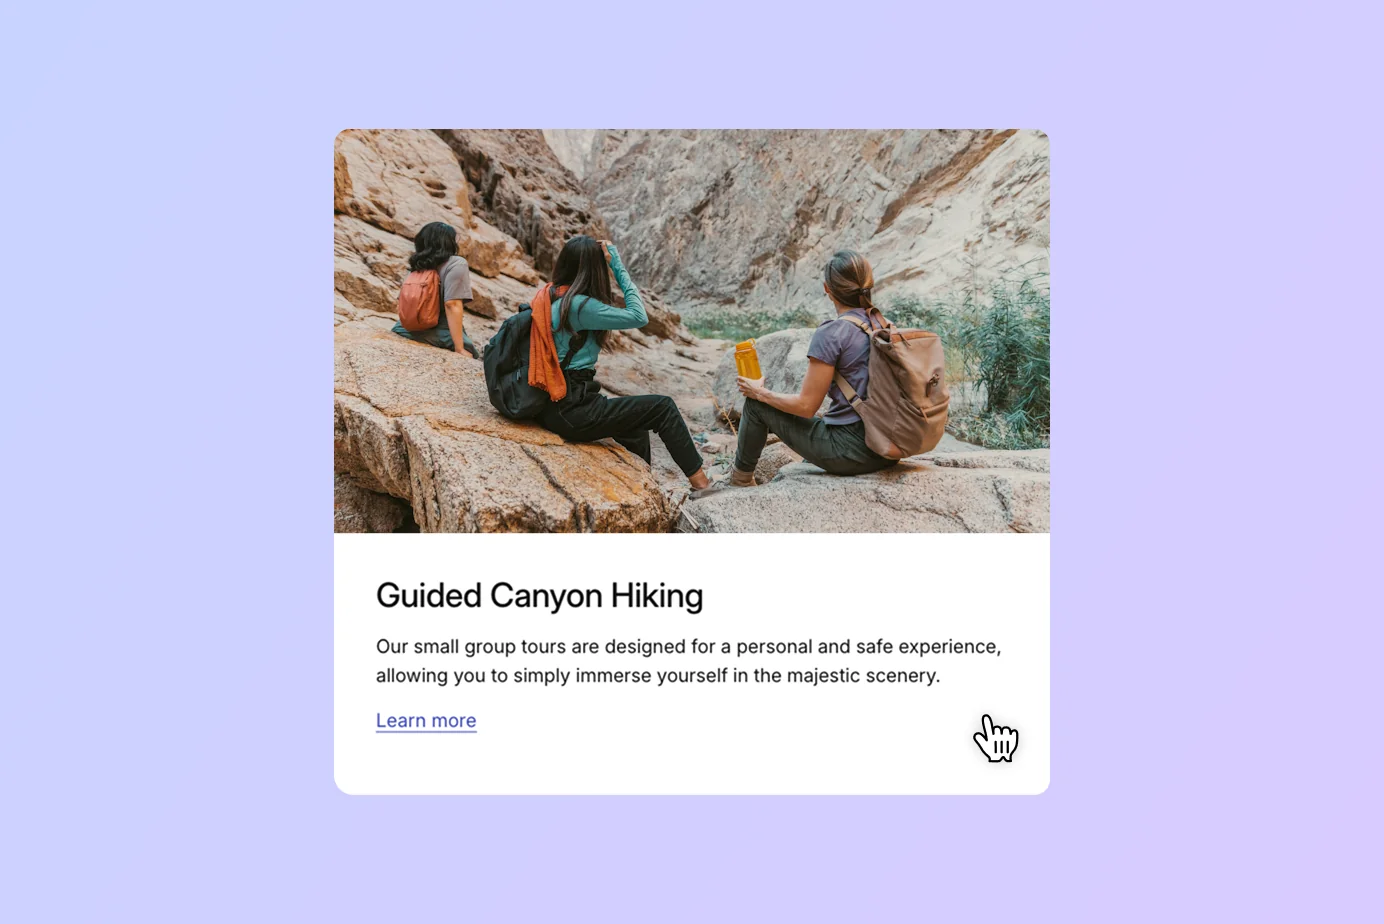
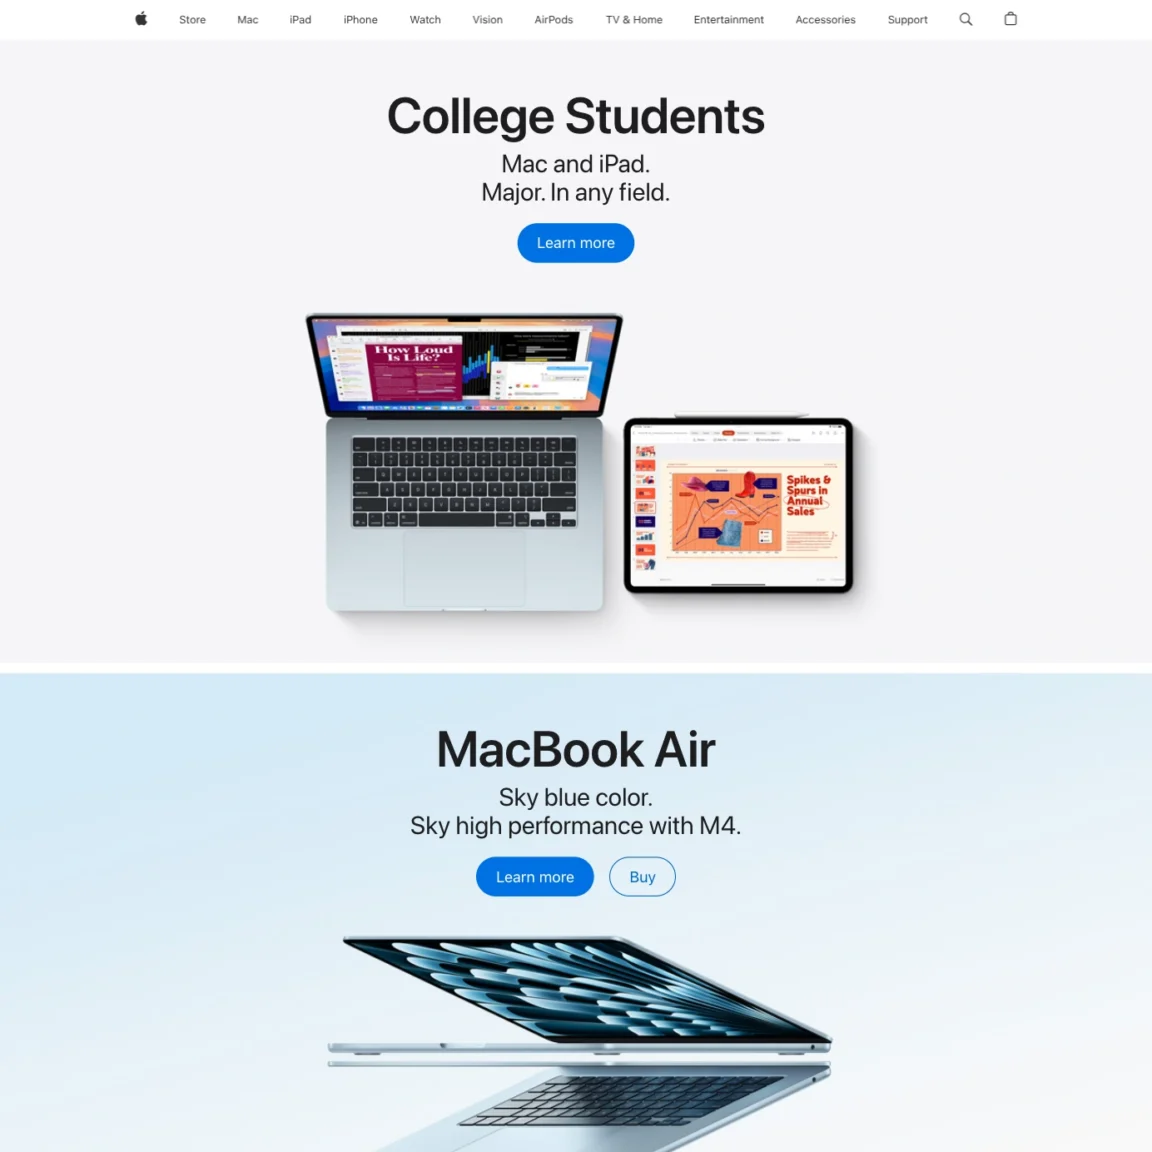
A great example of this design is on the Apple website, where sections on the homepage are often presented as large, self-contained, linked blocks. You can click anywhere on that group block — the heading, the text, the image, the button, or the section itself — and be taken to the same corresponding page, creating a seamless and intuitive user experience.
How to link a Group block in WordPress to make it entirely clickable
WordPress doesn’t include an option to link a Group block out of the box. That’s why we included a “Stretch link” setting in the Twentig plugin. This feature takes any link you place inside a Group block (on a button, heading, or paragraph) and stretches it to cover the entire Group, making the whole section clickable.
- Install Twentig: First, install and activate the Twentig plugin.
- Open your page: Open the page you want to edit in the block editor.
- Insert a link: Inside a Group block, add a link to an element like a Button, Heading, or Paragraph. This will be the link for the entire group.
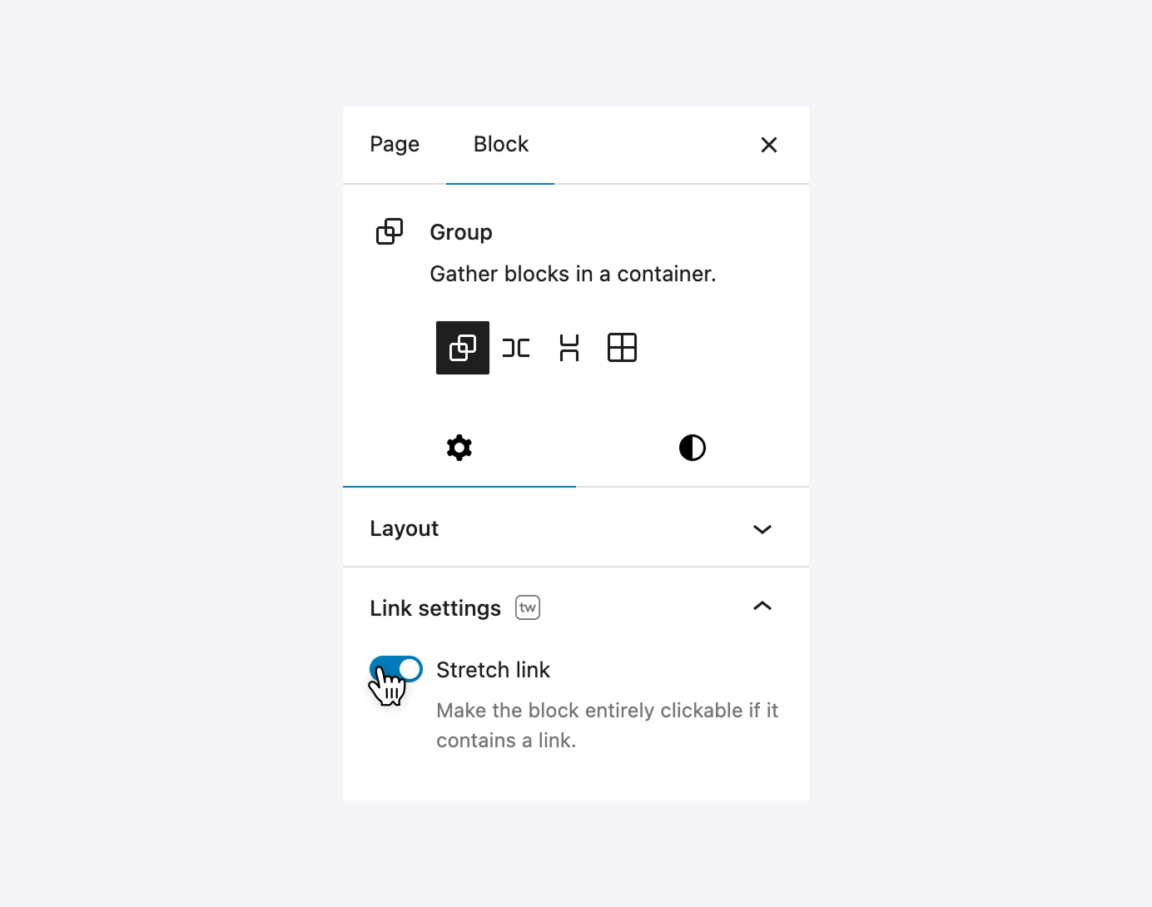
- Select the Group block: Click the parent Group block you want to make clickable.
- Enable the Stretch link setting: In the Group block settings sidebar, find the “Link settings” panel and toggle on the Stretch link option.
- Save your changes: Click “Update” or “Publish” to save your page.
Here’s the block code you can copy and paste to reproduce an Apple-style clickable full-width section:
<!-- wp:group {"align":"full","style":{"spacing":{"padding":{"top":"var:preset|spacing|60","bottom":"var:preset|spacing|60"}}},"layout":{"type":"constrained"},"twStretchedLink":true} -->
<div class="wp-block-group alignfull tw-stretched-link" style="padding-top:var(--wp--preset--spacing--60);padding-bottom:var(--wp--preset--spacing--60)">

<!-- wp:heading {"textAlign":"center"} -->
<h2 class="wp-block-heading has-text-align-center">Your section headline</h2>
<!-- /wp:heading -->

<!-- wp:paragraph {"align":"center","style":{"spacing":{"margin":{"top":"8px"}}}} -->
<p class="has-text-align-center" style="margin-top:8px">Add a short, engaging description for your section here.</p>
<!-- /wp:paragraph -->

<!-- wp:buttons {"layout":{"type":"flex","justifyContent":"center"}} -->
<div class="wp-block-buttons">
	<!-- wp:button -->
	<div class="wp-block-button"><a class="wp-block-button__link wp-element-button" href="#">Learn more</a></div>
	<!-- /wp:button -->
</div>
<!-- /wp:buttons -->

<!-- wp:image {"style":{"spacing":{"margin":{"top":"var:preset|spacing|50"}}}} -->
<figure class="wp-block-image" style="margin-top:var(--wp--preset--spacing--50)"><img alt=""/></figure>
<!-- /wp:image -->

</div>
<!-- /wp:group -->
Note: For the “Stretch link” feature to work correctly, you should generally have only one link inside the Group. If you need multiple links like in the second section of the Apple example, place multiple Button blocks inside a single parent Buttons block. In this scenario, Twentig will use the link from the first button and apply it to the entire Group.
Using a linked Group in the Query Loop
A common application for a linked group is within the Query Loop block that displays a list of your blog posts. A popular design pattern is to format each post as a clickable “card” that links to the full article.
However, this creates a potential problem: what if you have other links inside the card, like category or author tags? On a site like TechCrunch, clicking a post’s card takes you to the full story, but the category and author links are still clickable and lead to their own separate pages.
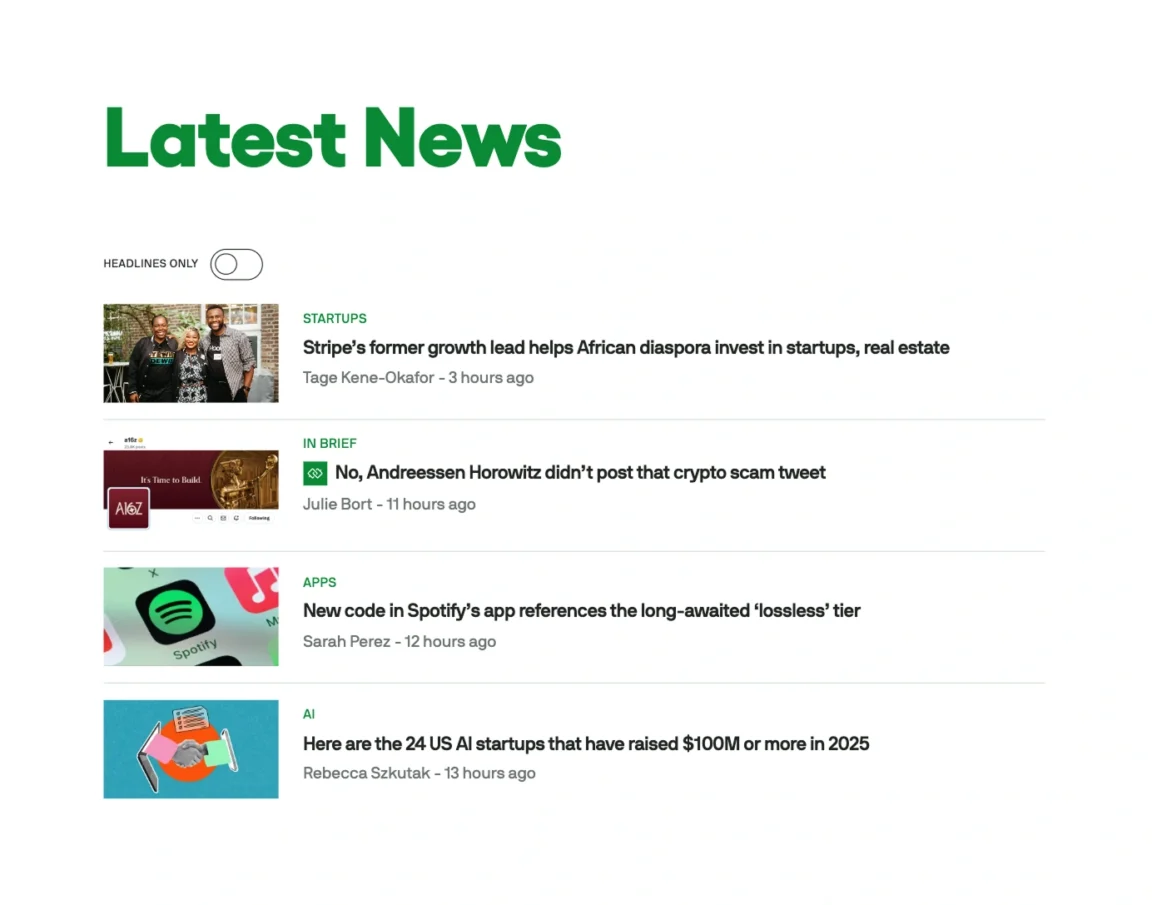
Twentig’s implementation is designed to handle this perfectly. When editing the Post Template inside a Query Loop block, you can wrap all the necessary blocks (Featured Image, Post Title, Post Excerpt…) in a parent Group block and then enable its “Stretch link” setting. This feature takes the main post link from the Post Title block and stretches it across the entire card, making each post clickable. At the same time, it ensures that other meta links such as categories, tags, or the author link remain independently clickable, directing users to the correct archive pages.
Here’s the block code you can copy and paste to reproduce a TechCrunch-style section of clickable posts.
<!-- wp:query {"query":{"perPage":8,"pages":0,"offset":"0","postType":"post","order":"desc","orderBy":"date","author":"","search":"","exclude":[],"sticky":"","inherit":false}} -->
<div class="wp-block-query">
<!-- wp:post-template {"style":{"spacing":{"blockGap":"0"}},"layout":{"type":"default"}} -->
<!-- wp:group {"style":{"border":{"bottom":{"width":"1px"},"top":{},"right":{},"left":{}},"spacing":{"padding":{"top":"var:preset|spacing|30","bottom":"var:preset|spacing|30"}}},"twStretchedLink":true} -->
<div class="wp-block-group tw-stretched-link" style="border-bottom-width:1px;padding-top:var(--wp--preset--spacing--30);padding-bottom:var(--wp--preset--spacing--30)">
	<!-- wp:columns {"isStackedOnMobile":false,"style":{"spacing":{"blockGap":{"left":"4%"}}}} -->
	<div class="wp-block-columns is-not-stacked-on-mobile">
	<!-- wp:column {"width":"20%"} -->
	<div class="wp-block-column" style="flex-basis:20%">
	<!-- wp:post-featured-image {"aspectRatio":"4/3","sizeSlug":"medium","useFirstImageFromPost":true} /-->
	</div>
	<!-- /wp:column -->

	<!-- wp:column {"style":{"spacing":{"blockGap":"8px"}}} -->
	<div class="wp-block-column">
	<!-- wp:post-terms {"term":"category","style":{"typography":{"lineHeight":"1.3"}},"fontSize":"x-small"} /-->
	<!-- wp:post-title {"isLink":true,"fontSize":"medium"} /-->
	<!-- wp:post-date {"fontSize":"x-small"} /-->
	</div>
	<!-- /wp:column -->
	</div>
<!-- /wp:columns -->
</div>
<!-- /wp:group -->
<!-- /wp:post-template -->

<!-- wp:query-pagination {"paginationArrow":"arrow","showLabel":false,"layout":{"type":"flex","justifyContent":"left"}} -->
	<!-- wp:query-pagination-previous /-->
	<!-- wp:query-pagination-numbers {"midSize":1} /-->
	<!-- wp:query-pagination-next /-->
<!-- /wp:query-pagination -->
</div>
<!-- /wp:query -->
Beyond the Group: Linking Cover and Column blocks
You’ve now mastered how to add a link to a WordPress Group, but the possibilities don’t stop there. To give you even more creative control, Twentig also adds the same powerful “Stretch link” setting to the Cover and Column blocks. Experiment with these blocks to take your website to the next level and create a more interactive and seamless experience for your visitors.